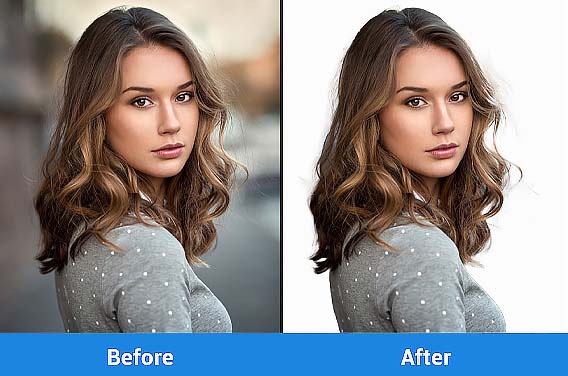
How to Replace or Remove an Image Background Using the Magic Wand Tool – An unwanted object in a photo can ruin a whole picture. But the most awkward thing happens when the imperfection attracts more than the real beauty of the picture. This is exactly why we need a good background remover, to save a whole picture from getting destroyed.
Adobe Photoshop is such software that can bring every possible change in a photo to make it look better, and for unwanted background removal, it has some effective tools. For a simple background removal, Magic tool can be the best option.
This tool is the oldest section of Photoshop, which works almost like magic and using this tool is also way easier if you know exactly how to use it. Now let’s learn how to replace or remove an image background using the Magic Wand Tool precisely.
What Is A Magic Wand Tool?
Photoshop’s Magic wand tool was basically originated to assist users in choosing the unwanted place of a photo and vanishing it with a few clicks. You will get to see the tool in the toolbar section. You just need to choose the part you want to remove or replace and then a few clicks, as simple as that.
It basically works based on colour and tone. When you choose a pixel, the magic wand detects similar other pixels that match with the one. With this tool, you can grant photoshop searching for all the pixels with the same border, or you can do it on your own. Photoshop is really good at finding the same pixel.
It actually works well with photos that have clear lines and clear colours. It’s good for a solid background. Avoid using these tools for blurry pictures as they may not give you the desired result.
How It Replaces Or Removes An Image Background
The magic wand works quite faster and efficiently.
1. Choose The Photo
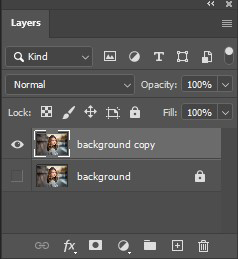
Open Photoshop CC 2020, select the File option from the menu bar now, pick the photo you want to edit, and then Open it. After that, it’s time to open the Layer panel. Click Windows then Layer. Remember to highlight the Background Layer in this section.

Now create a duplicated layer of the background layer by clicking on the layer then Duplicate Layer. You will have to set a name for the duplicate layer. After naming it, make sure the background layer is removed.
2. Concealing Background Layer
It’s very important to conceal the original background layer before you start editing. This will save you from getting distracted while working with the duplicate one. You will get to see a thumbnail in the layer platter at the left with an eye sign. Tap on that to conceal the original background layer.
3. Set Up Photoshop Magic Wand Tool
From the photoshop tool platter, which will be on the left of your PC screen, you will get the Magic Wand tool option, or you can use the shortcut key W to find it. Sometimes it hides after the Quick Selection Tool; therefore, it seems hard to find it. In this case, hold the Quick Selection Tool for a few moments after clicking on it. You will get to see the Magic Wand Tool appearing on your screen. Now click on it.
With the Magic Wand tool parameter, the highest or lowest selection level can be controlled at the same time. At the top of the screen, you will get the adjusting option.
Select the Single Section when you are newly using this Magic Wand Tool. You will get auto access to the Add to Selection option if you hold the Shift button.
With the Subtract from Selection option, vanishing pixels get easily available from your selection while you press on your selection area. Here the new selection will get created, and it comprises former selection pixels.
In the new version of Photoshop, you will get the Adjust Sample size available. Magic Wand Tool’s default characteristic is that it can choose a colour pixel only once. If you try to raise the sample size, it will moderate the pixel colour all around the sample.
Unless adjusting the Magic Wand Tool Tolerance, you can’t choose the maximum area at once. Try your best to keep the Tolerance limit between 15 – 30.
4. Do The Selection
For selection, you can use two methods.
- Background Selection
For background selection, click the Magic Wand Tool, press on any part of the photo which one you want to change.

Now hold the Shift key. Here click on the background areas as it was not selected at the primary stage. Now tap on Shift + Command + I for Mac and Shift + Ctrl + I for Windows. This will help you to choose the subject or choose Inverse.
- Subject Selection
Select the Magic Wand Tool but don’t tap on any part of the image. Press the Select Subject option to the top.
You will see the Subtract from Selection option at the top of the screen. Now except the subject, tap on any part of the image like the subject’s shadow or anything else. It will make sure that the place will be out of selection when editing the photo.
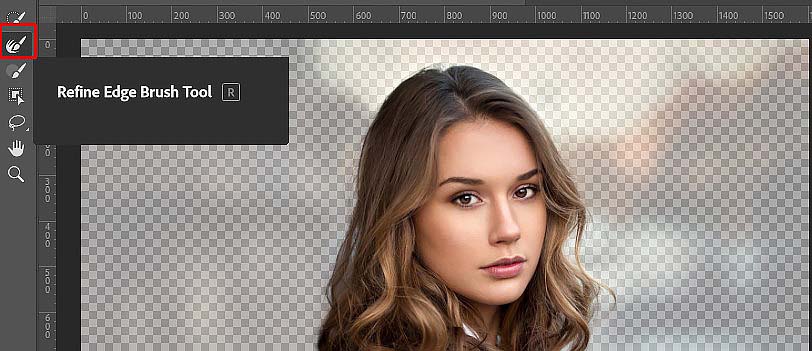
5. Refining Edge
Now choose the option Select and Mask. It’s on the right side of the Select Subject option. To the old version, you will find it as the Refind Edge. Now in a new window, a few adjustment tools will be seen.
Choose the View option right corner at the top from the Properties tab. Check whether On Layers (Y) is selected or not; if not, select it now. Here you will notice an isolated subject without a background.
You will get the Smooth Function option underneath the Global Refinements and Refine Edge Brush tool to the left of the screen. You will get help from these options. Drag the Smooth slider at the right side to smooth the rough edges of the subject.
Now to get the entry to the Refine Edge Tool, press R. This option will help you to find out the particular areas of the image. Choose the tool and paint over the selection area where changes are required.
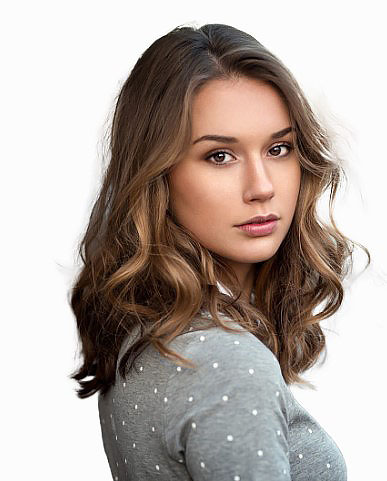
Move to the Output Setting at the lower right corner of the screen when the work is done as you wished. Then to Layer Mask select Output and then press the OK button. Now using the Layer Mask option, you will get the subject fully isolated from the background.
6. Try The New Background
You should have a selected background to use. Open that background image file. To select the whole image, press Ctrl + A. Now to copy this press Ctrl + C. Where the isolated subject is present, you need to go there. Now attach the background image to the isolated subject file pressing Ctrl + V.
Now you will get to see a new layer in between the duplicate layer and the original layer in the layer pallet. To make the original one visible, tap on the eye sign. Suppose your photo background is white; it will assist you to decide whether you want the new background image or not. As additional background, you can even add more layers. You need to press the eye sign to see how it looks when you use the other backgrounds.
While the layer creation is done, you can fill it with solid colours and you can check how it looks the whole.
7. Save the new image:
After completing all the above-described steps, now it is the turn to save the new image. On your screen to the left side, you’ll see the Save icon. Press on that icon, and the latest incarnation with the unique background will be saved.
Final Verdict :
If you are using this for the first time, you may face some difficulties, as it is a bit tough to find out the options at first. But hopefully, you can get rid of it if you follow the instructions thoroughly. This total instruction will show you how to replace or remove an image background using the Magic Wand Tool easily. So follow the instructions and get the perfect photo you were expecting. Use the Magic wand in an accurate way and get the best result.
How to Replace or Remove an Image Background Using the Magic Wand Tool
Published by
Clipping Path House – CPH Graphics Media
You may read CPH author’s another some famous post
Photoshop Image Editing Services – Photoshop Face Swap & Blend Technique in Easy Steps

LEARN THE PHOTOSHOP FACE SWAP AND BLEND TECHNIQUE IN JUST some easy


